Typesetter workflow guide
Typesetter workflow guide pageWhen you are assigned a typesetting task in Janeway, you will receive an email notification containing a link. This link will lead to the Janeway dashboard.
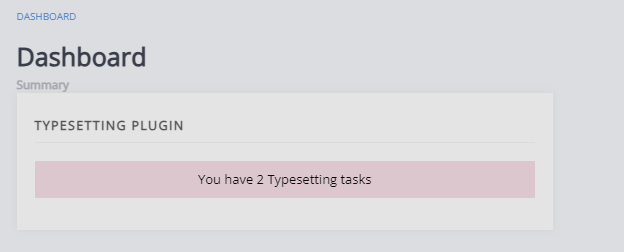
On the dashboard, you can see a block that displays the current number of open typesetting assignments. If you click on this block, it will take you to the Typesetting assignments page, and you will be able to see both your open typesetting assignments (the top block) and your completed assignments (the bottom block).
For open assignments, it will display:
- Title
- Current typesetting round
- Date it was assigned
- Due date
- Time to due date
For completed assignments, it will display:
- Title
- Typesetting round
- Date it was assigned
- Completion date
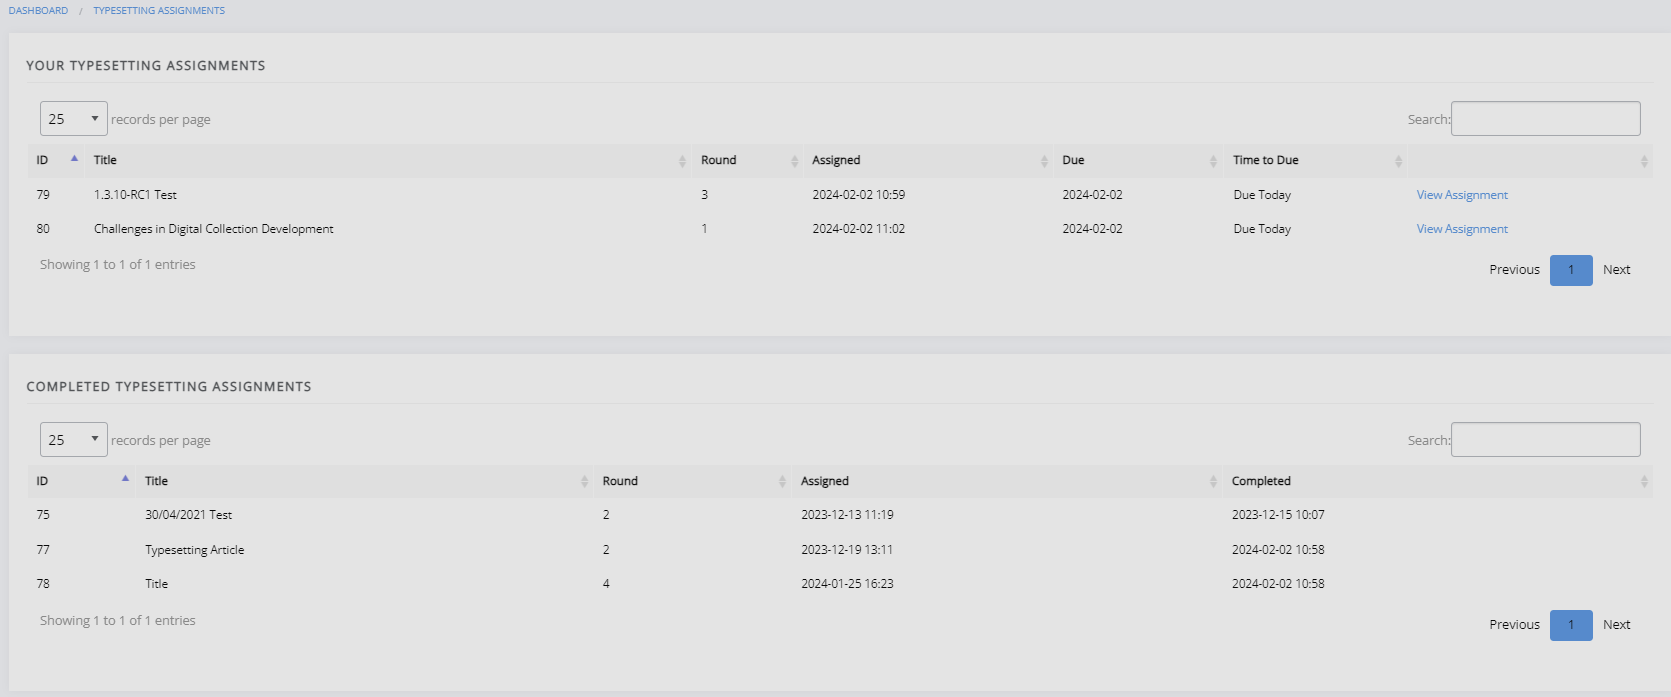
You can then click View assignment to display the assignment page.
Typesetting assignments page
Typesetting assignments page sectionOn this page, you will find relevant information about the typesetting task. This will include the instructions, manuscript files, metadata, options to accept or decline the task, and space to upload completed files.
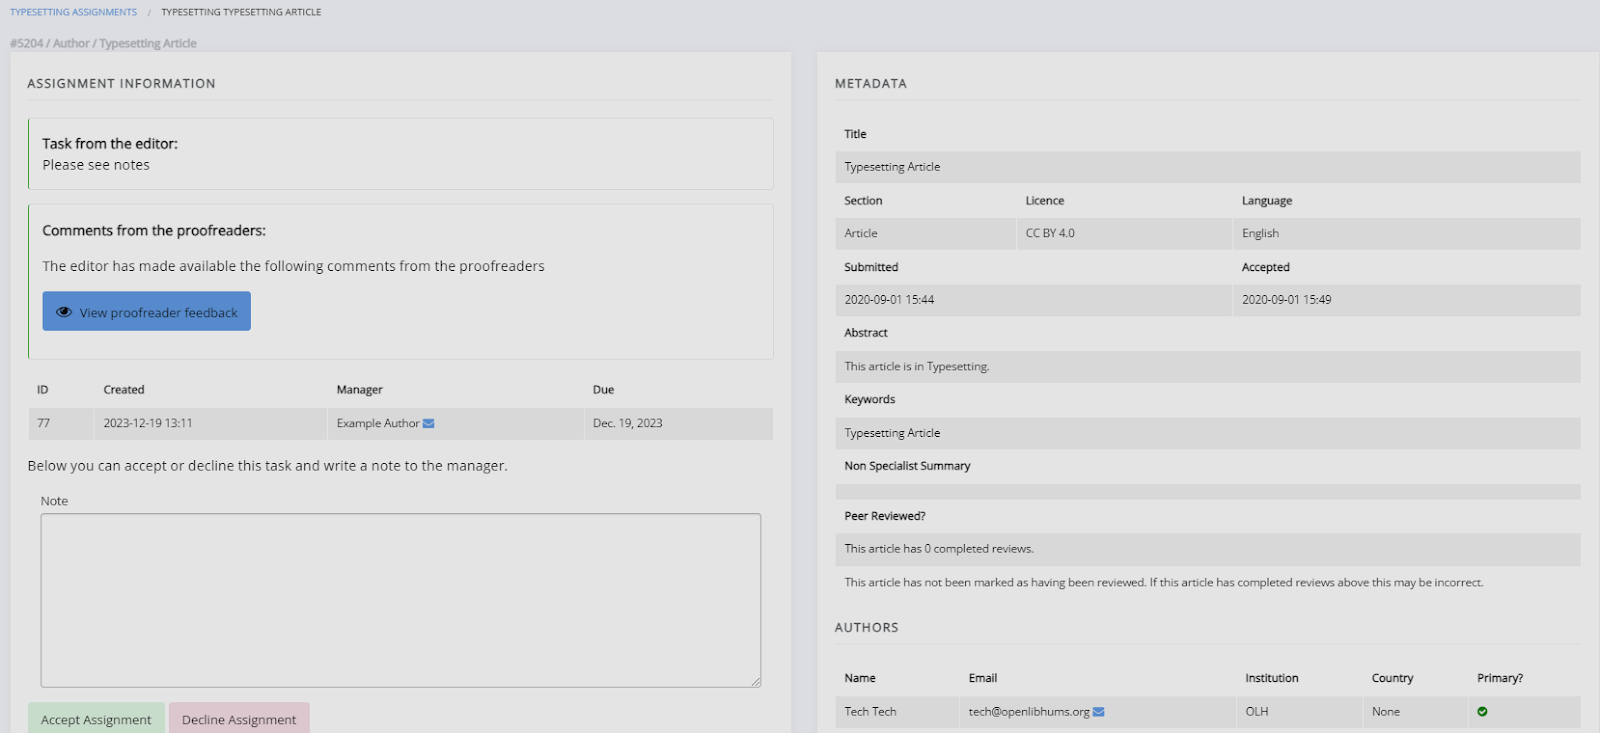
This page is divided into three sections.
-
Assignment information
- This section shows the typesetting guide, which the journal may use to provide a standard set of instructions for typesetting.
- You can view any comments from the editor or proofreaders.
- You can access the files to typeset (manuscript files) and any supplementary files.
- Under this, you will find space to upload your completed work and (if required) any source files.
-
Metadata
This is where you will find the metadata for the typesetting task. -
Complete typesetting
- Under this section, you can leave any notes to the editors.
- This is also where you will mark the assignment as complete to submit the uploaded files.
Uploading a typeset file
Uploading a typeset file section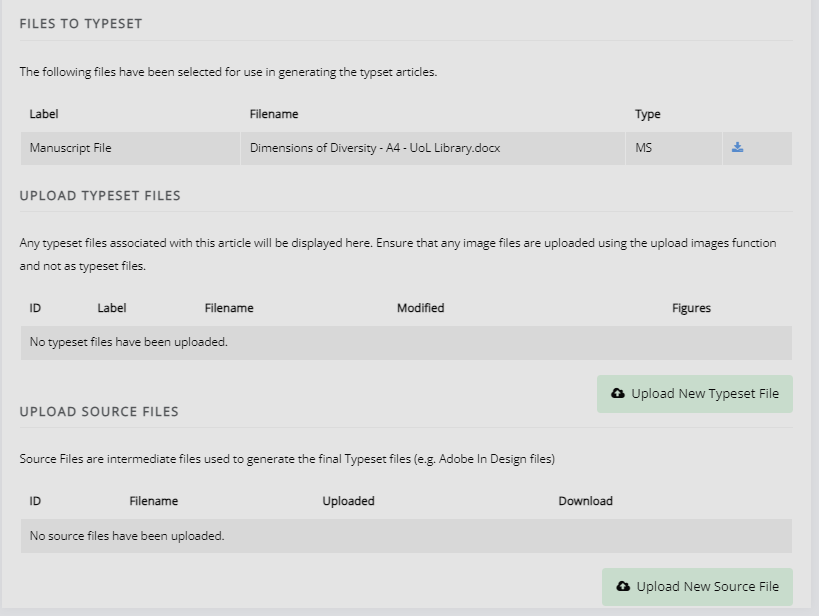
Click Upload a new typeset file to upload your completed work.
Source files (such as Adobe InDesign files) can be uploaded by clicking Upload new source file.
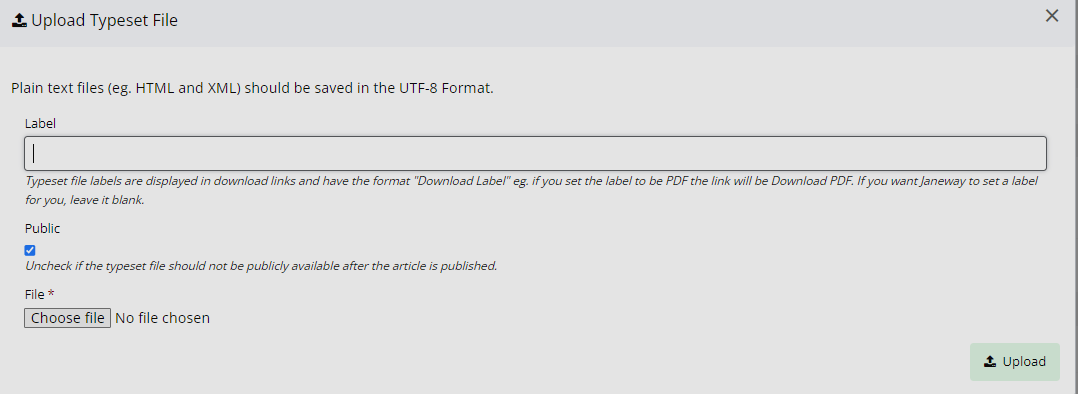
In this box, you can label your file with its file format. For instance, if this is an HTML file, you should label it as 'HTML'. If it is a PDF, you should label it as 'PDF', etc.
Janeway will attempt to provide an appropriate label if this is left blank. However, if you wish to ensure the label is correct, you can manually enter the file type. For instructions on how to edit a label, see the section below.
Warning
Janeway operates with the UTF-8 encoding. Ensure that you upload any HTML and XML files (plain text galleys) using this encoding.
Editing typeset files and uploading additional files
Editing typeset files and uploading additional files sectionIf you need to make changes to the typeset files, you can reupload them or upload additional files through the Edit typeset file page. This page can be accessed by clicking Edit.
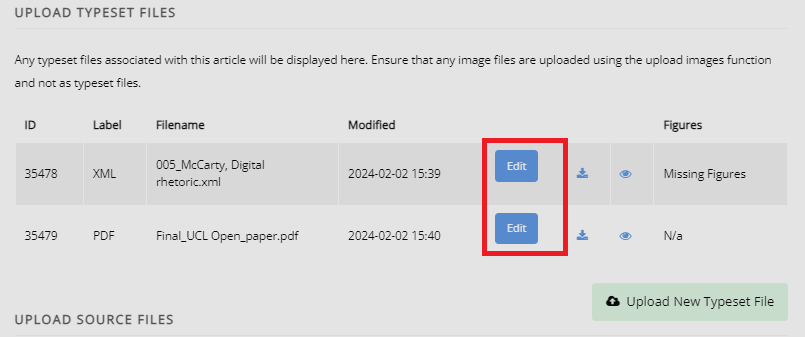
This page is divided into three sections:
-
The typeset file
You can replace the typeset file and see the file history here. -
Typeset file details
This is where you can edit the file label, which denotes the file type. -
Additional file uploads
- If authors or editors have already provided images, you can find and select them here.
- You can upload images as individual image files or using a ZIP file.
- There is space to upload a CSS file to accompany the galley.
- You can change the XSLT file used to render the galley.
Managing typeset files
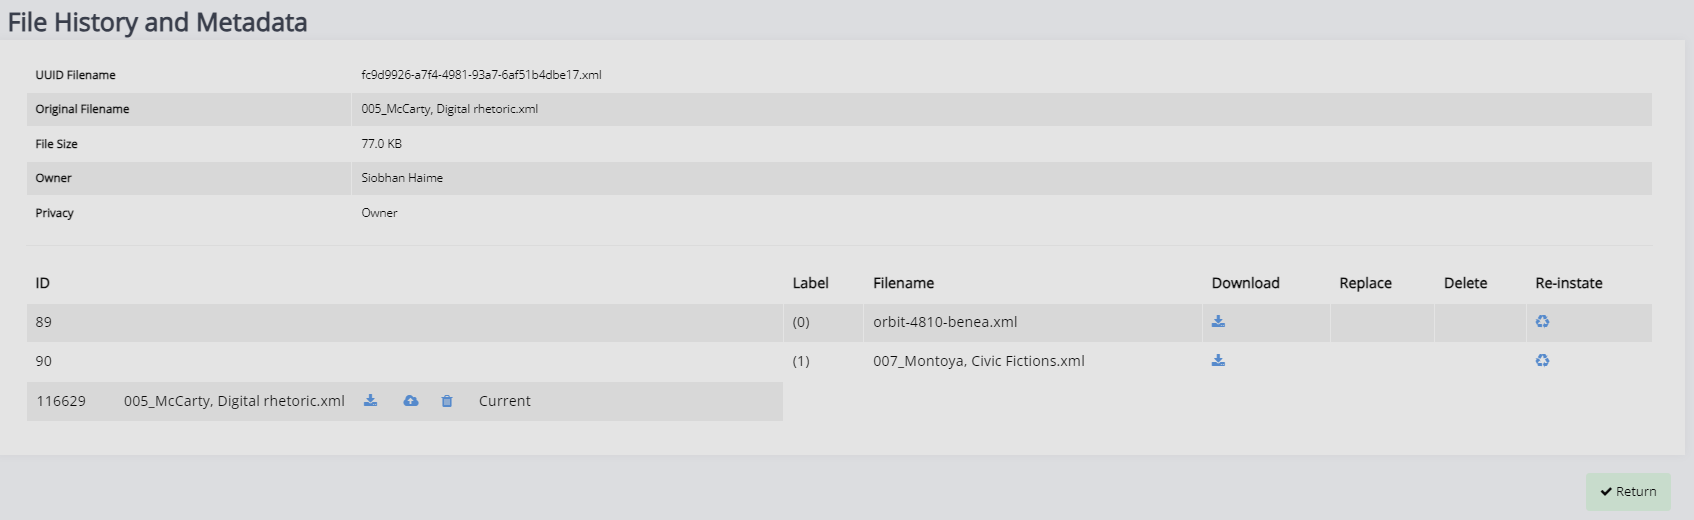
Managing typeset files sectionIn the first section of the page, you can view the file currently uploaded and replace or download it. You can also view the file's history by clicking on the button under History.
This will open a page where you can download and reinstate previous versions or delete the current file entirely (in case you have uploaded an incorrect file).
Managing images and figure files
Managing images and figure files section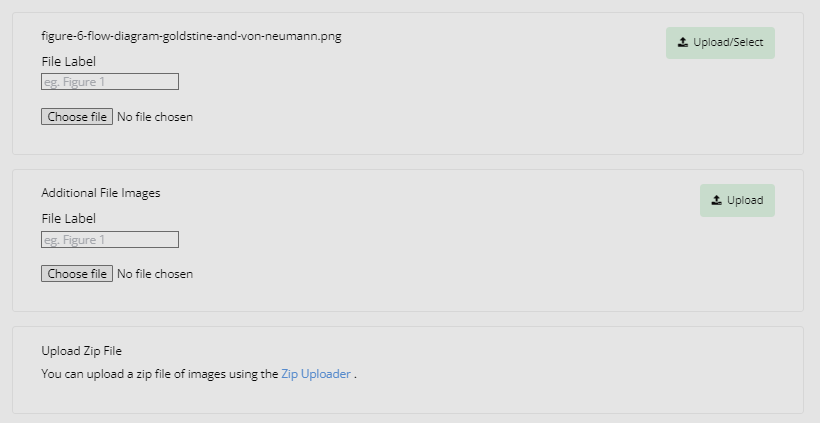
When a file typeset in HTML or XML contains image links, Janeway will detect these and prompt you to upload the image files. The file names must match the src or href used in the XML/HTML and be relative (e.g. src="fig1.jpg).
If the image files have already been uploaded onto Janeway, you can select them instead.
If you need to upload a large number of images, it may be faster to use the zip uploader (click on Upload zip file, highlighted in the image below). To do so, create a ZIP archive file with all the image files. The image filenames must match the links in the typeset file; otherwise, they will not be imported.
Styling
Styling sectionOn this page, you can also upload a CSS file associated with the article for an individual style, if required. It is recommended to avoid style changes to the header and footer type elements, as this will affect the page's layout.
You can also select the XSL file used to render the HTML from the file. Unless explicitly instructed otherwise, this will be the Janeway default (1.4.3). In that case, the editors will communicate this as part of the typesetting task or agreement.
Finishing up
Finishing up sectionOnce you finish the typesetting (or correction) task, you can leave a note for the editor, click the button to complete the task and send it to the editor for review. Note that you cannot return to this page once you complete the task.
Note
If you attempt to complete the typesetting task with potential issues remaining (e.g. missing image files, typeset files that have not been corrected), Janeway will warn you about this.
Typesetting recipes
Typesetting recipes sectionRight-to-left text direction
Right-to-left text direction sectionArabic and many other languages are written right to left, requiring special markup in an XHTML environment that operates left-to-right by default.
Here is an example in JATS XML of an isolated bit of Arabic text in a
document that is otherwise left-to-right:
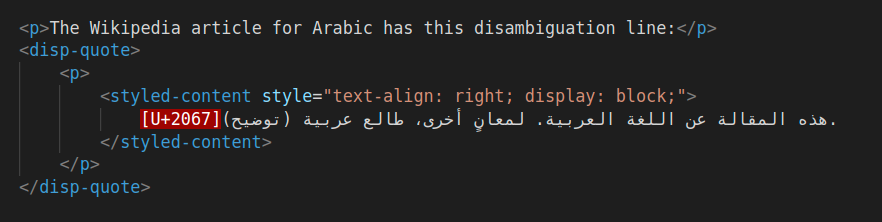
Make sure you use a text editor that shows zero-width unicode characters, like U-2067. The above screenshot is an XML file opened in VS Code.
Here is the rendered output:

Notice the following about the code sample:
- On each line, begin with the RLI unicode character (U+2067) at the beginning of the line to explicitly trigger right-to-left rendering for the remainder of the line, including symbols like periods that the browser would otherwise render left-to-right. This is roughly equivalent to the HTML attribute dir="rtl". If working with periods or other punctuation, note that they may appear on the right in your code editor, but render on the left in the browser.
- Wrap each line in the styled-content JATS element and apply a style attribute specifying CSS for right text alignment and block display.
- When working with long lines of text, make sure not to introduce arbitrary line breaks.
Center alignment
Center alignment sectionIn some cases you might need to center-align text:
<styled-content style="text-align: center; display: block;">
    Leaves are falling
</styled-content>
The output is:

This is accomplished with the the styled-content JATS element and a style attribute specifying CSS for center text alignment and block display.